There are so many ways you could decorate this wrap. The dollar store here has quite a variety of iron on or sew on sequins and embellishments and glass beads. But I raided my Grandma T's craft stash which I inherited and pulled out a skein of mauve wool yarn and a tatted dragonfly pin she had made and some vintage glass crystal buttons
Crochet Edging
Blanket stitch around the entire poncho, (every raw edge) with your yarn and darning needle. As you add new yarn and gain tails, leave the tails to tie in as you crochet later. I also blanket stitched around the neck to sew the raw edges of the hood and poncho together. If I find my missing yarn, I would use this blanket stitch to attach the collar to.
Crochet Directions: with a size J hook
Starting at the point of the wrap, Single crochet along the curve of the wrap and around the entire bottom of the poncho. As you come to the place where the fronts and backs meet at the arm pit/elbow, single crochet decrease right in the corner.As you come to tails from your blanket stitch, work them into the single crochet stitch.
Row 2: ch 4 and skip first single crochet. *Double crochet in next single crochet st, ch 1, skip next single crochet* repeat from * all the way around, doing a double crochet decrease at the armpit/elbow. Finish to the point of the wrap end, ch3 and join to last single crochet.
DON'T TIE OFF if you want to use crochet as an embellishment such as mine.
ch 100 or more stitches, until you have a string long enough for you to play with and design on your wrap end. Tie off.
Lay the chains (ribbon or braid if you would rather) flat on your wrap end and design a pattern. Pin it into place as you go. Decide where you might add buttons or sequins or other embellishments as you pin. Sew the chain into place as you would ribbon and sew on your embellishments.
Pin your brooch at the front on your shoulder. Sew ribbon ties to the hood if you wish. And you're done!
If there is ever a part 3 to this, it will be for the collar...(now to find that silly yarn!)
Some people love ponchos' for some it is traditional wear, for others it's the warmth, but for me I always look like I paid a visit to Omar the tent maker and asked him to sew me a sweater, I just don't look good in them. But I LOVE their warmth and I hate how I am always dropping a wrap or shawl...you cant work in them.But I had a vision of draping beauty. I was originally going to try to knit the entire creation, but I get distracted easily and large projects get left on my needles for extended periods of time. So I found a fleece blanket at the thrift store for a couple of dollars and pulled some wool yarn and crystal buttons out of my stash. What do you think?! The shawl that never falls off!
Here are my basic drawings I used to design the pattern (Click on the drawings to see them in full page)
I never got to making the collar, I wanted to knit or crochet it, but one of my balls of yarn has mysteriously rolled away into a hidden bliss.
To make this it helps if you know how to.....
Sew a straight stitch and zigzag on a sewing machine
sew on buttons
Materials
One personal size fleece throw or 1.5 m of polar fleece
Matching Thread
One favorite bulky sweater to trace for pattern.
1 Shawl pin/brooch
Embellishments of your favorite kind, buttons, braid , sequins, ribbon etc
1 average size skein of worsted weight or double knit yarn
Darning needle
Directions
Fold your fleece in half the longestway possible. At the far left side, lay your favorite comfy sweater on to the fabric, with the neck line at the fold of the fabric. Fold the sweater arms in onto the sweater, from 2 inches below the armpit.
Sewing Instructions
Turn right side out and try it on! Place a pin at your shoulder that the wrap end covers to hold the wrap in place.
To sew on the hood, mark the center back of the hood and the center back of the neck and match. Pin into place all the way around and sew
Now you are ready to embellish your wrap on the tail. Part 2 will be the crochet edge instructions.
When I was a little girl I always knew what I was giving my daddy for Christmas....Soap on a rope! And every year he would look surprised as he opened my gift, and proclaim it to be perfect!
Well, this year he's getting...FELTED soap on a rope (as are a few other men on the family Christmas list)
Crochet Felted Soap on a Rope
Materials
1/2 a ball of worsted weight felt-able wool yarn
Crochet hook size 6.00 mm
1 bar of soap (I used Zest)
Directions
Ch 7 st
Sc in first st from hook to end. 3 sc in end st. DO NOT Turn Work. Sc back down the other side of your chain with 3sc in last st. Crochet with sc in the round until "bag" is barely big enough for the bar of soap to fit into sideways and have open edges meet.
With a sl st, grab a loop from opposite sides of the opening and with sl st close the bag all the way with the soap inside. Slip st to the middle of the bag "top" and chain 40 st and join again to the top of the bag.
End off and tie in.
Now the fun part!
FELTING
You need a sink of hot water that you can just barely stand you hands in and a bucket of cold water. If you have a wash board, pull it out, if not use a VERY fine food grater.
Submerge the soap in the hot water and be sure it is good and wet. Then start rubbing the soap in your hands to felt the fibers. Dip in the cold water to rinse suds and repeat with a dip in the hot water and scrub.
Use your wash board/grater (or a rough surface)to scrub the fibers into felt, following the hot bath /cold dip method, until you are satisfied with your felting.
Lay flat on a towel to partially dry, and then hang from a towel bar to finish drying completely.
I have a hard fast rule that I won't spend more than $10 out of pocket on a friends birthday gift. DD has a dear, sweet friends Birthday to go to tomorrow and we just finished the gift. I SWEAR I only spent $10....I just happened to add to it with some busy sewing fingers and my scrap bag and supplies on hand!
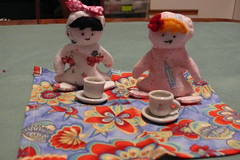
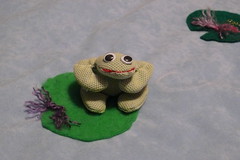
I made two more of my little travel dolls, a picnic blanket and a play mat from discounted fabric at Walmart
:o( sadly, we too are loosing our fabric department ) and purchased a small set of doll house dishes and a draw string bag at the Dollar Store. I also made a tiny frog for friends little brother to play along with. The joy of this mat, is that it is also a tied blanket quilt with batting in it, and a game!
(DD doesn't know it, but she's getting one of these for Christmas! )
When I can figure out a better way to link PDF's I intend to post all these as patterns. But for now, I hope you find it an inspiration in these pictures!
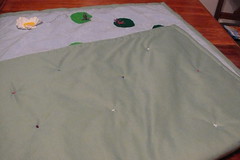
I purchased 1 m of green and 0.8m of blue soft suede velvet and 1 m of quilt batting.
I trimmed 3 inches off of the width of the blue fabric and cut the batting to fit. I layed down the green and then the batting and then the blue and cut the green 2 inches larger all around than the blue to become the binding.
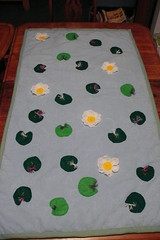
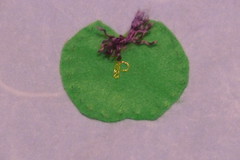
I had a handful of polyester felt squares and gold embroidery thread on hand. The Flowers are silk flowers removed from the plastic stems and a yellow circle of felt was sewn into each one. Each lily pad and flower has a letter of the alphabet embroidered in the center, (The flowers are the vowels). I sewed them onto the blue and then I folded the green up double over the blue and pinned into place. I sewd it by hand onto the blue and went around a second time, hand quilting through all layers.
Each lily pad used two strands of yarn to tie the quilt for the quilting. I frayed them to make them look like flowers.n On the back, they look like little "Forget- me- nots" where the dolls can have a picnic together on their picnic blanket
Nature Play Mat/ Blanket
Enjoy a picnic with your dolls on one side and a swim in the lake on the other. Or wrap it around tight to keep warm on a cold day. But this is not only a fun play mat and a blanket, but it is a game as well! On the pond, you will see each lily pad has a letter of the Alphabet. The set of dolls or frogs become your playing pieces and the lily pads and flowers become your squares.
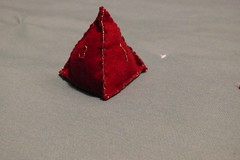
How to use the triangle die
Roll the triangle dice and then pick it up from the point on the top. Tip it over and look at the number that is on the flat bottom and that is the number of spaces you jump.
Games to Play
Depending how old you are, you can play the alphabet game in so many ways.
If you are just learning your letters, roll the die and jump the number of squares. Name the letter you land on correctly! If you don’t name it correctly the first time, you miss a turn.
If you are learning your letter sounds, roll the die and jump the number of squares. Name the letter and it’s sound.
For example:The Letter (S) says “sssss”.
If you are wrong, you will miss a turn though. And remember, if you land on a vowel, it has two sounds. If you get both sounds right you may take a second turn!
If you are reading, roll the die and jump the number of squares. Name a word that starts with that letter. If you are spelling, spell that word correctly. If you are wrong you miss a turn. At your next turn, spell the word correctly before you move the dice to move on.
The first person in any game to reach the letter “Z” wins the game!
Beanbag Toss Game
Decide how many tosses each person gets. Toss a doll, and which ever letter the doll lands on, follow the directions in one of the games above minus the die.
Make a point system if you wish:
1 point if you land in water but name a letter close by and follow directions,
2 points for landing on a lily pad and following directions
3 points for landing on a flower and following directions
Keep score on a chalkboard or paper, and at the end of the tosses, add up the score to see who has the most points
Cleaning Instructions.
Dolls and Frogs are made of Flannel and filled with rice. Wash surface with a damp cloth if needed
Mat/ Blanket is made of plush fabrics and should be surface wiped with a damp cloth, or immersed in a tub of luke-warm water and a mild detergent and hung to dry to be freshened. Do not iron.
I was looking up puppets for a Little House project and I spent some time admiring professional puppets. They look like so much fun! We have a few at home that we play with, and they are great for story telling and role playing. And as I was web browsing I saw some puppets that were two handed-one for the mouth movements and the other fit into a shirt sleeve that was on the body of the puppet and into a gloved hand. It really helps to animate the the puppet.
So my gears started working and with the puppets I had seen, including a puppet on Dr Wonders Workshop, and the desire to add a new activity to our ASL learning I came up with Paws. You don't need a working mouth for an ASL puppet, but two working hands!
He is an over sized 20" stuffed animal that I bought at the thrift store, a size 6X boys long sleeve jersey shirt and a pair of fleece gloves. (You could use stretchy gloves from the dollar store as well) All those supplies cost me a whopping $3!
Here are the directions....
Materials
1 large cuddly stuffed animal of choice (make sure there is a forehead and a mouth area and a chin area on the head, sounds crazy, but trust me! Round headed animals are the easiest)
1 long sleeved shirt that fits the animal (don't worry about extra long arms or length, just have a pleasant fit around the body and neck. Make sure that you can fit your forearms into the sleeves and your hands past the cuffs.)
1 pair of fleece, nylon or stretch knit gloves. (Thick heavy gloves or chenille gloves don't work because you can't shape signs with your fingers well enough)
Tools Needed
scissors
stitch ripper
pins
a strong all purpose thread in the color of the shirt and the animal
hand needle
sewing machine
Directions
Prepare the Bear (or other stuffed animal like our lion):Carefully with your stitch ripper, remove the arms of your animal and then with your needle, whip stitch the body closed. (I know, a sad thing to do. That's why we didn't pick a toy from our own toy boxes) Set aside and pick up the shirt.
Armholes: Carefully cut the back seam of the shirt arm that runs from the shoulder to the under arm along the seam. Roll and pin the now cut and open area into a hem and sew all around with your sewing machine.
Hands: Sew the gloves by hand to the inside cuff of the shirt. Stretch the gloves and cuff with your non sewing hand inside of them as you sew the two together around and along the shirts natural hem. This way you know you have enough stretch to get your hands through
Shortening and lining the shirt: Now here comes the tricky to explain part.... the shirt will probably be way to long for the puppet, but you are going to use the extra length to create a liner so that you don't have stray fur or color popping out of the arm openings as you use your puppet.
- From the shirt bottom, fold the shirt up inside itself until the bottom hem at the side seam reaches the shoulder seam right by the neckline. With your needle and matching thread tack the shoulder/neck seam and bottom hem together. Repeat for second side.
- Lay the shirt flat on a table inside right, and with the bottom hem still tucked up inside, even up the fold around the bottom and pin all the way around
- Sew around the shirt 1 inch up from the fold edge. This makes the shirt look like it's hemmed.
5. Place the shirt on the puppet. With a needle and thread tack the shirt (at the same place you tacked the shirt at the neck) to the top of where you whip stitched the arm holes together. This would be the shoulder of the puppet. Do this on both side so that the shirt won't be removed. The remaining tucked up shirt fabric is just left alone, unless you find there is too much bulk, then you could tack it in various discreet places to the puppet.
6. Now have fun! Go to Paws To Tell You or SigningSavvy to learn some ASL alphabet and favorite words (manners like "please" and "thank-you" are good preschool signs to start with)
Place an arm down each sleeve and place the puppet in your lap. Keep your elbows tight to your side as you move the arms of your puppet. (or it will look like a puppet gone out of control with dislocated joints!)